While many of us have already gotten rid of running terraform apply locally, unfortunately others still haven’t found a way to escape this burden.
Whether due to lack of knowledge or budget constraints (Terraform Cloud costs around $0.10USD/managed resource 🤑). Whatever the problem, I’ll try to help you solve it and get out of this miserable life 😅.
The simplest and cheapest way I’ll show you is using Atlantis .
Atlantis is a tool for team collaboration[…]
The main functionality of Atlantis is to enable/allow developers
to runplanandapplydirectly from Pull/Merge Requests.
Thus providing visibility and control over infrastructure as code.
Link to the post here
TL;DR ⚡️
-
What is Atlantis? A GitOps automation tool for Terraform that allows you to run plan and apply directly in your Pull Requests (PRs), centralizing collaboration and change history for infrastructure code.
-
Easy Installation: I’ll show you how to spin up an Atlantis instance in minutes with a simple
docker-compose.ymlfile and how to configure it to connect to your GitHub repository via webhook. -
Standard Workflow: When opening a PR, Atlantis automatically runs a
terraform planand posts the result as a comment. After approval, just commentatlantis applyto apply the changes. Everything within your PR! -
Custom Workflows: Learn to use the
atlantis.yamlfile to create custom pipelines, adding extra steps like running validation scripts, tests, or security tools. -
Infracost Integration: an extra suggested by Vinicius Casellato on LinkedIn! We integrate Infracost into the custom workflow so that, along with the plan, Atlantis also comments on the PR with a detailed cost estimate of that change 🤩.
-
Result: Have full visibility of the technical and financial impact of your changes before apply, avoiding billing surprises and promoting greater visibility and control by the Infrastructure team in your dev/production environments.
What is Atlantis? 🏝️
Atlantis shines in scenarios with many devs/devops/platform engineers working on the same codebase and with a volume of changes where collaborators end up “stepping on each other’s toes”, that is, in a dynamic environment of any minimally structured company in the Cloud era, this is the reality.
Common solutions are CI/CD pipelines like Gitlab or GitHub Actions, which are usually not cheap for slightly larger teams. Gitlab costs around 29 bucks per dev on the team in the most basic plan and GitHub will cost around 21 bucks per dev. Yes, I know both have free tiers, but they’re usually quite limited and capped, meaning few CI/CD minutes and missing essential features. If you’re on a team where there’s already a CI/CD tool implemented, I believe this post will be more instructional than practical from the perspective of changing the IaC CD tool – it doesn’t make sense to switch to Atlantis if your team already has a ready and in-use solution.
Well, let’s get to what matters, “Atlantis to the rescue!”
Installing Atlantis
To keep things simple (or at least as simple as possible) throughout this article, I’ll adopt Docker compose along with zrok to run the service locally. And I’ll use GitHub to serve as a repository for our Terraform code.
So here’s a little list of what we need to make it happen:
- AWS account
- GitHub account
- zrok account
- have the zrok cli installed on your machine
- Docker Compose part of Docker, just install:
curl -fsSL get.docker.com | sh -and you’re ready. For Windows, figure it out 😜.
Getting AWS credentials
I’ll use AWS in this example just because it’s simple to start and the free tier is quite generous. If you’re familiar with another Cloud provider, you can continue with it.
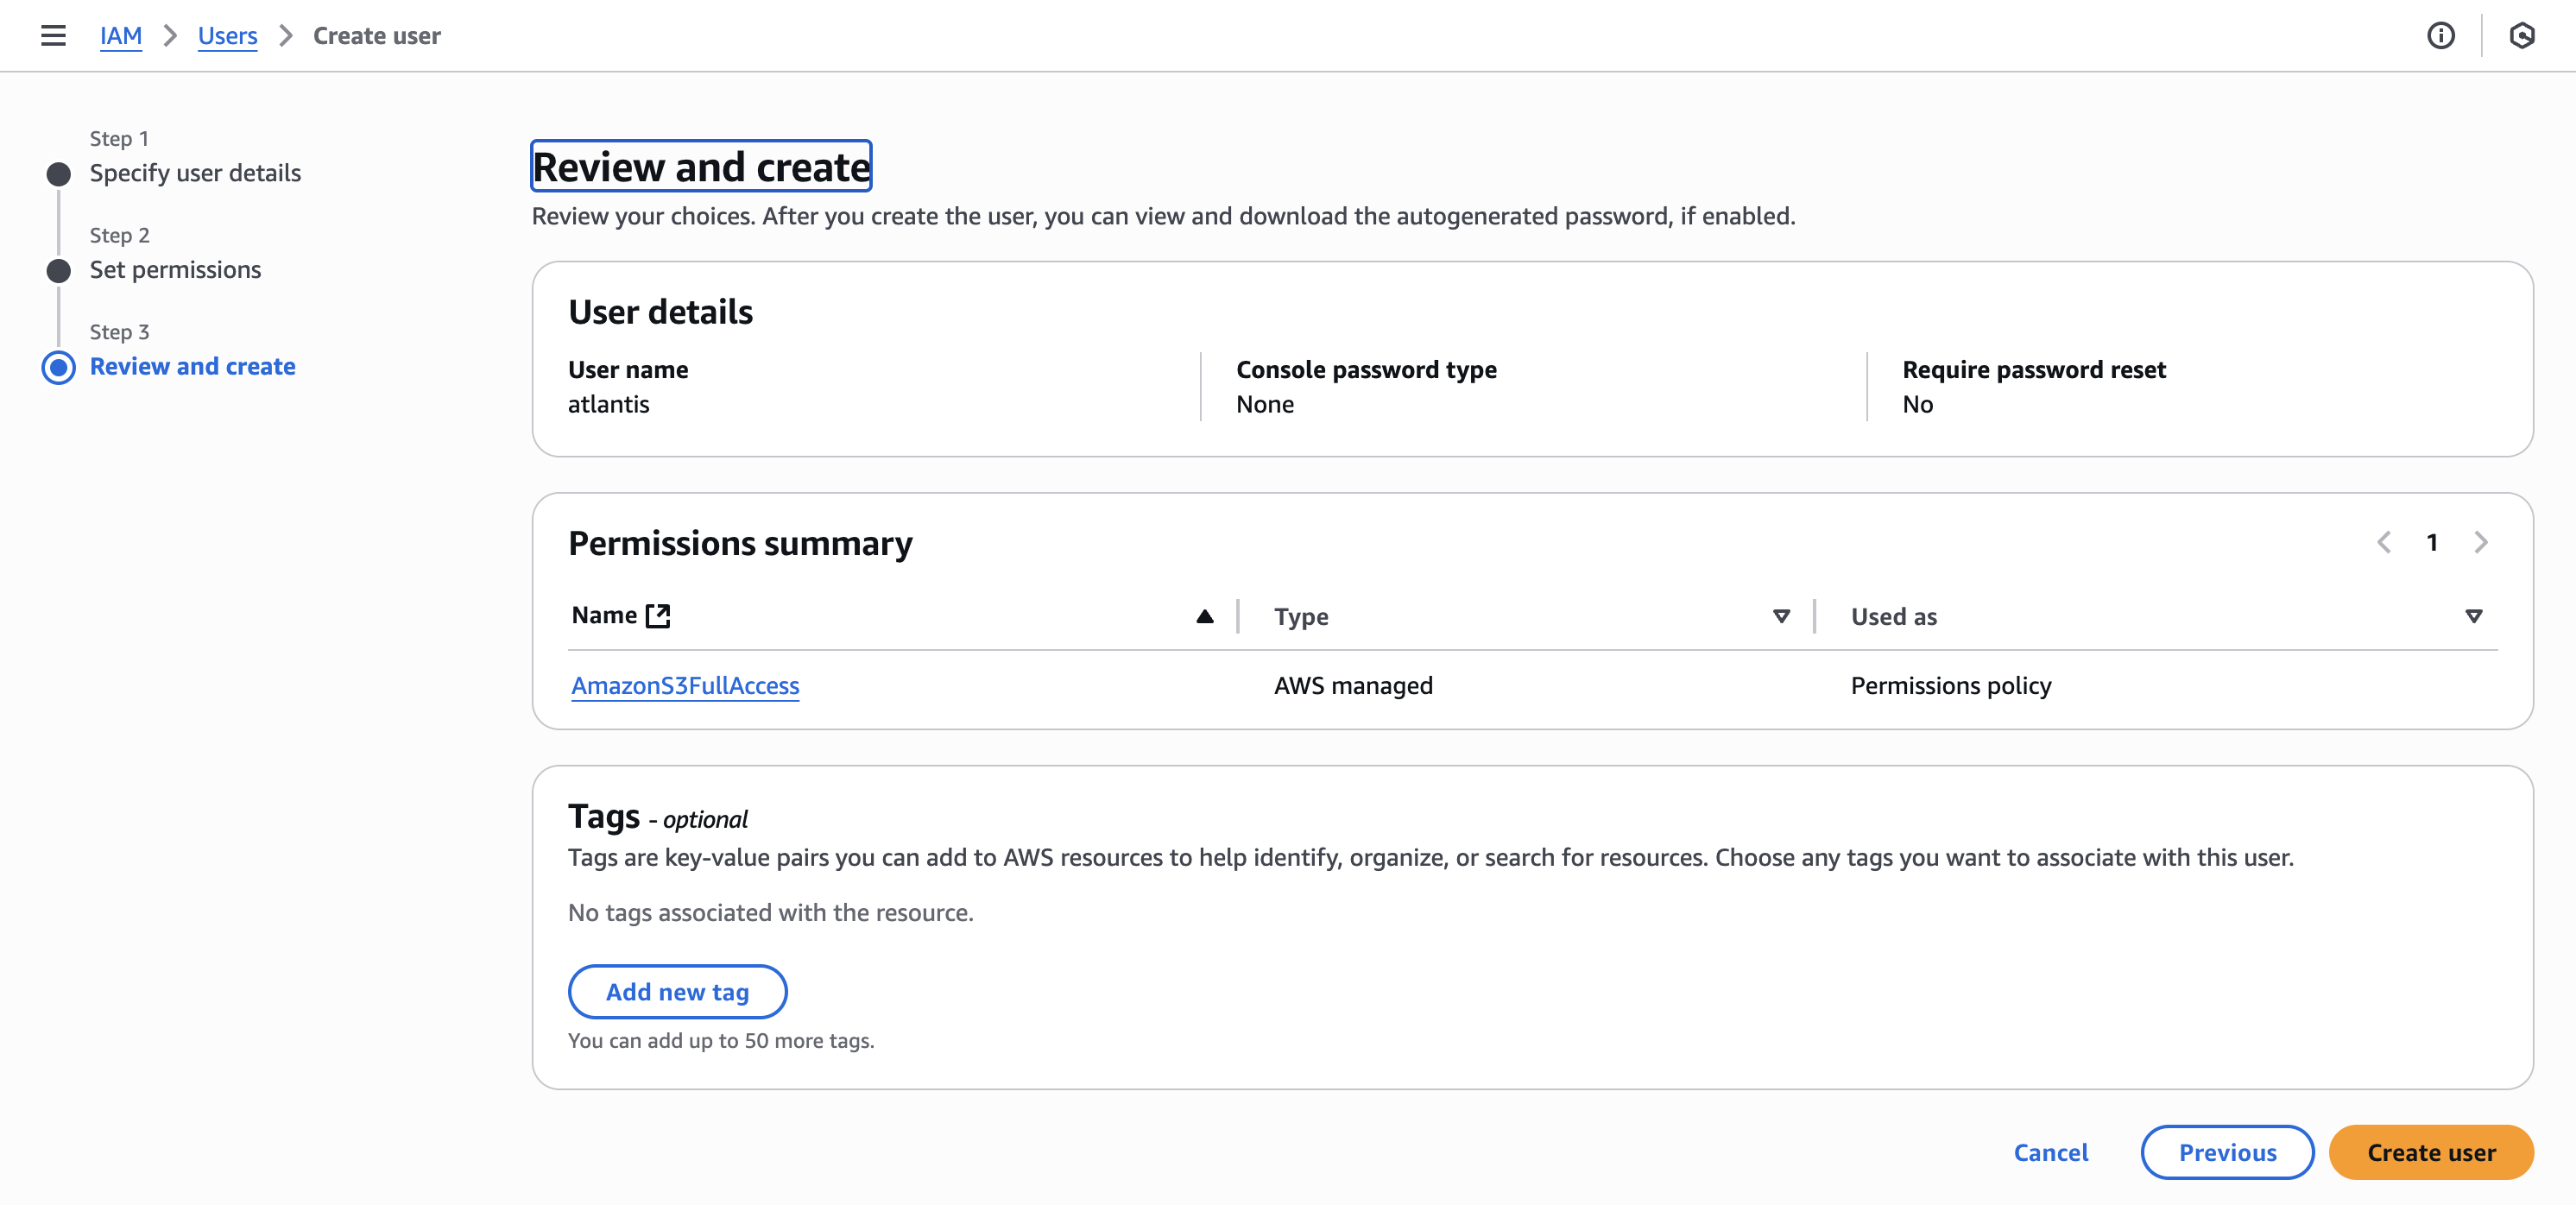
Log into your AWS account, go to IAM and create a new user, name it atlantis. For permissions, select only what you want this user to have permissions for, in our case I selected S3 Full Access, since the example will be quite simple, and we’ll only create an S3 bucket.
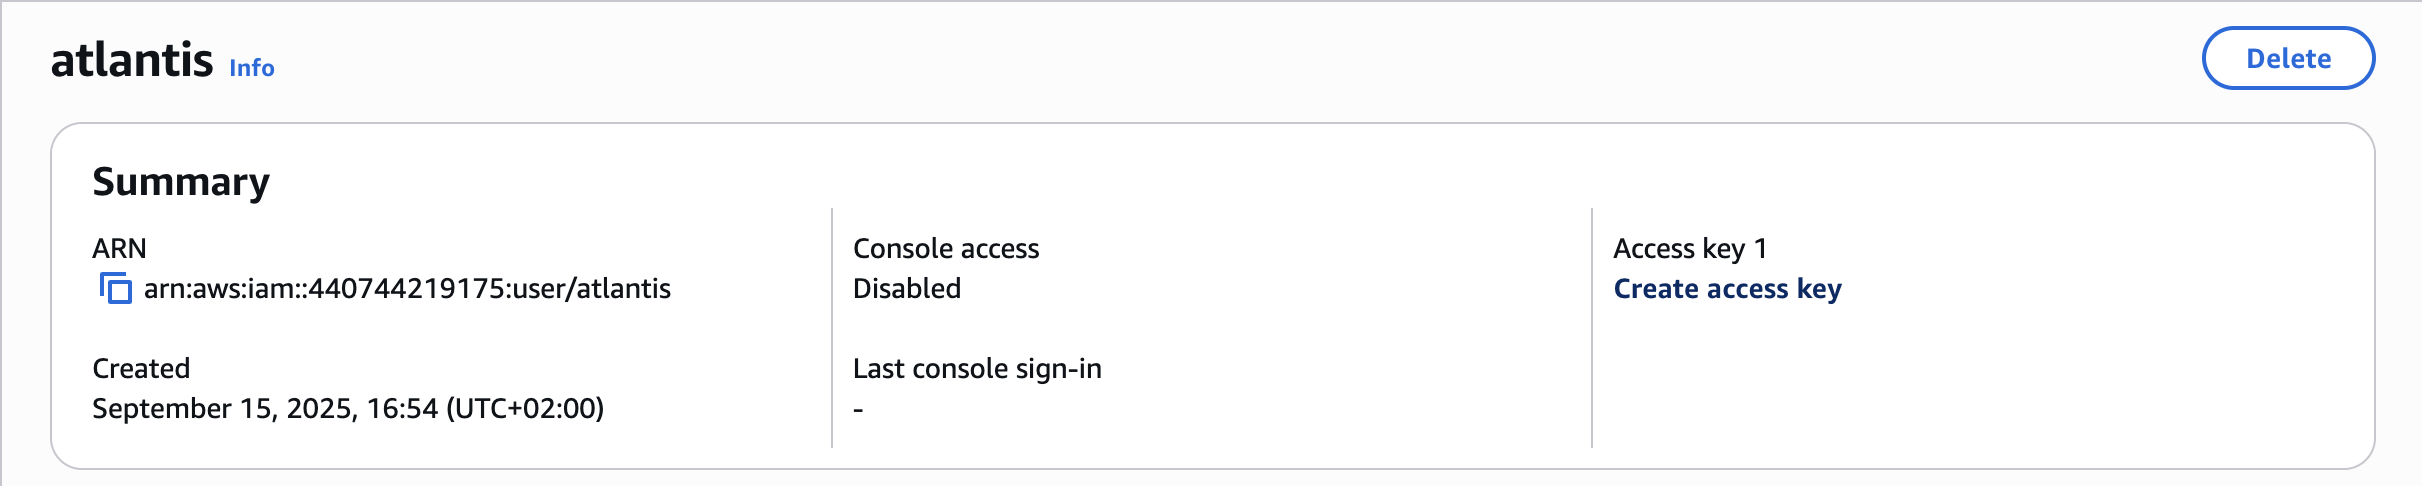
Select the Third-party service type, check the confirmation checkbox and click Next. You’ll be presented with the ACCESS KEY and SECRET KEY, save this data as you won’t be able to see it again.
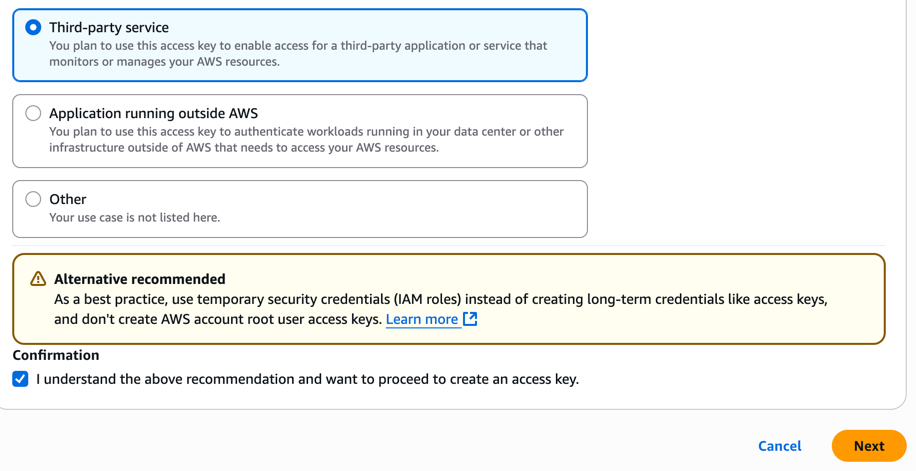
⚠️ IMPORTANT ⚠️: with these credentials, anyone can create resources, delete resources, edit resources and everything else in your account. Keep this information like a secret/password.
GitHub Token
Next step is to get a token to access our repositories on GitHub. There are two ways to get a token for GitHub: 1) Personal Access Token or 2) App Token. I’ll opt for option number 1 given the simplicity, but the recommended approach for production workloads would be to use an App Token. Here’s the Atlantis documentation to make it work with App token .
Let’s click on our profile picture after logging into GitHub and go to Settings. In the left sidebar menu, scroll to the bottom and click on Developer Settings. On the new page that loads, click on Personal access tokens and select Tokens (classic), now click on Generate new token and Generate new token (classic) – GitHub might ask you to authenticate again.
Let’s give a “name” to this token using the Note field. Make sure to select an expiration date (tokens without expiration dates are as dangerous as keys under the door mat), select repo in the token scope and click Generate token.
⚠️ IMPORTANT ⚠️: keep this token like a password/secret as it has unrestricted access to our GitHub.
ZROK
Since the Atlantis service will be running locally on our machine, we need a way to expose it to the internet so the GitHub webhook can “notify” Atlantis that it needs to work. That’s where zrok comes in.
For zrok to be able to expose Atlantis, we need to enable our environment (our machine), for this, follow the steps here . After enabling the environment, we need to reserve a public address, for this run the following command:
zrok reserve public --unique-name "atlantis" atlantis:4141
Zrok will give you a public URL, copy the value to use in the docker compose file.
[   3.519]    INFO main.(*reserveCommand).run: your reserved share token is 'atlantis'
[   3.519]    INFO main.(*reserveCommand).run: reserved frontend endpoint: https://atlantis.share.zrok.io
Docker Compose
Now let’s go to Docker Compose (if you have no idea what Docker compose is, then read this article here and/or here ).
We need a docker-compose.yml file containing both Atlantis and zrok, this way we’ll have what’s necessary to run Atlantis and expose it to the internet so GitHub can access the Atlantis events endpoint – this is how it will know it’s time to run plan and apply.
Now create the docker-compose.yaml file with the following content:
services:
  zrok:
    image: openziti/zrok
    restart: unless-stopped
    user: "${UID}"
    volumes:
      - ${HOME}/.zrok:/home/ziggy/.zrok
    environment:
      PFXLOG_NO_JSON: "true"
    command: share reserved "atlantis" --headless

  atlantis:
    image: ghcr.io/runatlantis/atlantis:latest
    user: atlantis
    environment:
      ATLANTIS_ATLANTIS_URL: "https://atlantis.share.zrok.io"
      ATLANTIS_GH_TOKEN: "<Atlantis GH token>"
      ATLANTIS_GH_USER:	"ricardosilva86"
      ATLANTIS_GH_WEBHOOK_SECRET: "<webhook secret>"
      ATLANTIS_REPO_ALLOWLIST: "*"
      ATLANTIS_EMOJI_REACTION: "eyes"
      ATLANTIS_REPO_CONFIG: "/home/atlantis/repos.yaml"
      AWS_ACCESS_KEY_ID: "<AWS access key>"
      AWS_SECRET_ACCESS_KEY: "<AWS secret key>"
      AWS_REGION: "eu-central-1"
      ATLANTIS_AUTOMERGE: true
    ports:
      - 4141:4141
    volumes:
      - type: bind
        source: ${HOME}/.atlantis
        target: /home/atlantis
Obviously we need to replace the important values here with our own:
ATLANTIS_ATLANTIS_URL: that URL that zrok gave us right after creating the environmentATLANTIS_GH_TOKEN: we need a Token for Atlantis to authenticate with GitHubATLANTIS_GH_WEBHOOK_SECRET: generate a random number using random.org , don’t use special characters, only[a-z] [A-Z] [0-9]with 32 characters.ATLANTIS_REPO_ALLOWLIST: the URL of our GitHub repository, see here for the format of this URLATLANTIS_REPO_CONFIG: where we’ll find the Atlantis configuration file on the server sideATLANTIS_EMOJI_REACTION: the name of the emoji that Atlantis will react with when it notices theatlantis plan/applycomment in your MR/PR.AWS_ACCESS_KEY_ID: here goes the AWS key ID for theatlantisuser we created in the first step.AWS_SECRET_ACCESS_KEY: obviously here goes the secret key.
Explaining what we’ve done so far:
- We created a user in AWS, attached a policy to this user to be able to perform the actions we need, in our example here, we’ll only have access to S3. We also created the Access Key and stored the credentials securely – I saved them in my 1Password ;)
- We also created our Personal access token on GitHub so that Atlantis can access the repository containing the Terraform code it will automate.
- We installed and enabled
zrokto be able to expose Atlantis to the internet. - We created our
docker-compose.yamlfile to be able to spin up the Atlantis service.
Up to this point we have almost everything in place, now we just need a few more details.
Configuring Atlantis
Terraform code we’re going to automate
I created a repository on GitHub to demonstrate what we’re going to do. Basically we have the following code:
# main.tf
resource "aws_s3_bucket" "balde-de-lixo" {
  bucket = var.nome_do_balde
  tags   = var.tags
}
# backend.tf
terraform {
  backend "s3" {
    bucket = "atlantis-tfstate-files"
    key    = "atlantis-intro/terraform.tfstate"
    region = "eu-central-1"
  }
}
# providers.tf
terraform {
  required_providers {
    aws = {
      source  = "hashicorp/aws"
      version = "~> 6.0"
    }
  }
}

provider "aws" {
  region = "eu-central-1"
}
# outputs.tf
output "domain_name" {
  value = aws_s3_bucket.balde-de-lixo.bucket_domain_name
}
# variables.tf
variable "nome_do_balde" {
  type = string
}

variable "tags" {
  type = map(string)
}
# terraform.tfvars
nome_do_balde = "balde-de-lixo-do-plancton"
tags = {
  Env  = "dev"
  Team = "Infra"
}
Basic code to create an S3 bucket, using another bucket as backend for our state.
Now we have 2 important steps to configure Atlantis: 1. the Atlantis configuration file and 2. the GitHub webhook to call Atlantis.
The Atlantis configuration file
In the docker-compose.yml we created above, we mounted a volume: our home pointing to a hidden directory called .atlantis. If you haven’t created this directory yet, now is the time.
Right after creating this directory, create the file called repos.yaml inside the newly created directory.
# a list of repository configurations
repos:
- id: /.*/
  branch: /.*/
  plan_requirements: []
  apply_requirements: [mergeable, undiverged, applied]
  import_requirements: [mergeable, undiverged]
  allowed_overrides: [apply_requirements, workflow, delete_source_branch_on_merge, repo_locking, repo_locks, custom_policy_check, import_requirements, plan_requirements, silence_pr_comments]
  # allowed_workflows: [development,production] ≤- we'll use these configurations later
  # allow_custom_workflows: true ≤- we'll use these configurations later
  repo_locking: true
  repo_locks:
    mode: on_plan
  custom_policy_check: false
  policy_check: false
  autodiscover:
    mode: auto

- id: github.com/ricardosilva86/atlantis-intro-tf
There are countless ways to configure your repositories, if you need something more, try the official documentation, which is great, here .
Basically here I set a global configuration with id: /.*/. All repositories inherit this configuration and if you want to change something, just add the change for the specific repository.
Creating the webhook on GitHub
Now let’s go to the last part of this setup, creating the webhook in our GitHub repository.
Access your repository on GitHub and go to Settings, in the sidebar click on Webhook. In Payload URL enter the URL that zrok provided us and add /events, in Content type, select application/json and enter the same secret we generated for the ATLANTIS_GH_WEBHOOK_SECRET variable in the first part. Now let’s choose which events will trigger the webhook, select Let me select individual events. and then check the options: Pull request reviews, Pull requests, Pushes and Issue comments. Make sure the Active checkbox is checked and click Add webhook.
Remember at the beginning we had how to create 2 different types of tokens, a Personal access token and the App token? If you opt for an App token, the webhook is created automatically. See the documentation here . It’s also possible to install the webhook at the organization level, which speeds up the process of configuring these webhooks, but it’s also necessary to disable it for repositories that are not infrastructure code.
Finally, let’s get this thing running! But first, let’s recap what we’ve done so far:
Explaining what we’ve done so far pt.2:
- We created a repository on GitHub and created very elementary Terraform code;
- We created the local directory that will be mounted in the Atlantis container, and inside this directory we created the
repos.yaml. Then we put the configuration file content for Atlantis. - We created the webhook that will make the call for Atlantis to execute the workflow: in other words, the
planandapplyon the server side.
Wow, finally it’s showtime!
docker compose up -d
WARN[0000] The "UID" variable is not set. Defaulting to a blank string.
[+] Running 24/24
 ✔ zrok Pulled                                                       19.3s
   ✔ 7b061f511294 Pull complete                                      10.5s
   ✔ 3d6607d3dbc4 Pull complete                                      10.5s
   ✔ 6cff76b535d3 Pull complete                                      13.1s
   ✔ b3d72ae26f8f Pull complete                                      13.5s
   ✔ d5b4f1acfb29 Pull complete                                      13.5s
   ✔ 77b5f4970fe8 Pull complete                                      13.5s
   ✔ 9e3046e1ce9b Pull complete                                      13.5s
   ✔ 4f4fb700ef54 Pull complete                                      13.9s
   ✔ b9529084985f Pull complete                                      16.4s
   ✔ c30168d90002 Pull complete                                      16.4s
   ✔ eac112e77b9c Pull complete                                      16.5s
   ✔ 95c29cd56481 Pull complete                                      16.5s
   ✔ cd012eabab7e Pull complete                                      17.5s
 ✔ atlantis Pulled                                                   16.7s
   ✔ 6e771e15690e Pull complete                                       6.5s
   ✔ 305ced8d2b86 Pull complete                                       6.5s
   ✔ fc5cd065b9fe Pull complete                                       6.9s
   ✔ e9bfac012337 Pull complete                                      10.5s
   ✔ 2bea7a2ea3a3 Pull complete                                      12.1s
   ✔ d47b004927cf Pull complete                                      12.6s
   ✔ 2d95b90dee76 Pull complete                                      12.9s
   ✔ 5032dfc784ba Pull complete                                      12.9s
   ✔ b6b31555fe60 Pull complete                                      15.3s
[+] Running 3/3
 ✔ Network atlantis-intro_default       Created                       0.1s
 ✔ Container atlantis-intro-zrok-1      Started                       1.7s
 ✔ Container atlantis-intro-atlantis-1  Started                       1.7s
Let’s see if this magical contraption really worked:
- open your browser and go to localhost:4141 , if the Atlantis page opens, we’re doing well.
- open the browser and go to the
zrokURL, the same page should open and finally - open the webhook settings and go to the Recent Deliveries tab, click on the 3 dots and select Redeliver, confirm that you want to do the redelivery by clicking the Yes,… button, wait a few seconds, and we should now have a new item with the redelivery tag with a small blue ✓ on the left side.
If all 3 checks worked it means we have everything working!
Time to test if the GitHub integration is really working 🥁🥁🥁
Let’s make a change to the GitHub code and create a Pull Request. As soon as you change the code and push the new branch and create the PR, you’ll see something like this:
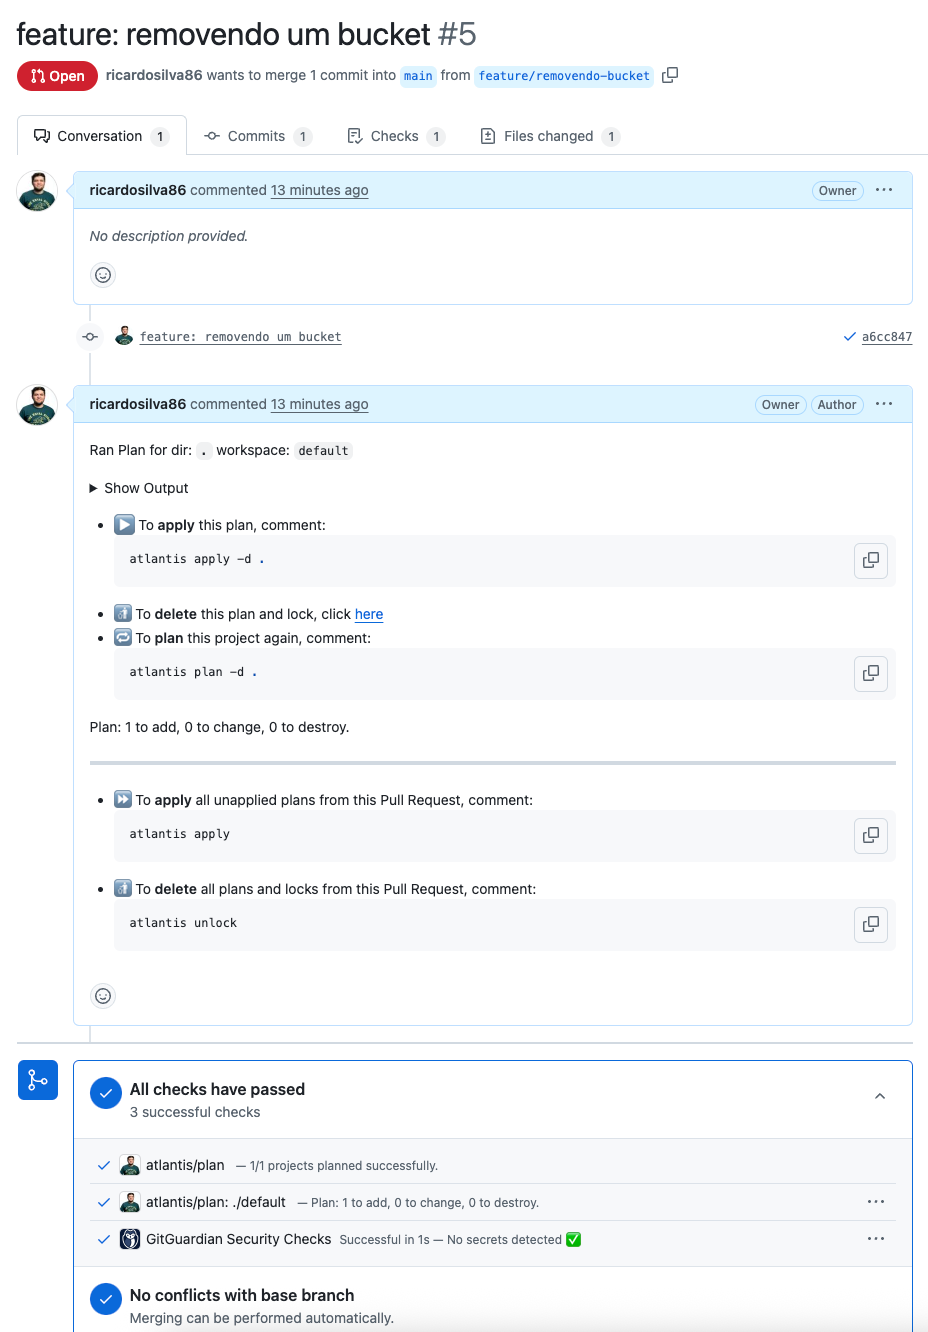
Let’s say I was happy with the plan result and want to apply, just comment atlantis apply and you’ll see the following:
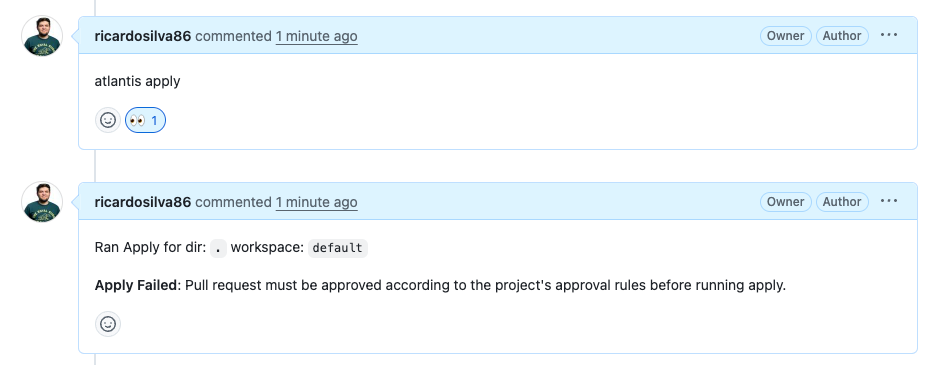
It failed because we defined that the code can only be applied if the PR is mergeable, undiverged, applied, that is, it needs to be without conflicts, be ahead of the target branch (if n commits behind appears somewhere in your PR, it means commits are missing that have already gone to the target/target branch and haven’t gone to your PR) and finally, it needs to be approved.
If you’re testing alone, remove the
approvedbecause GitHub doesn’t allow PR approval by its author, unless you create a ruleset that defines Bypass for administrators.
There you go, check it out:
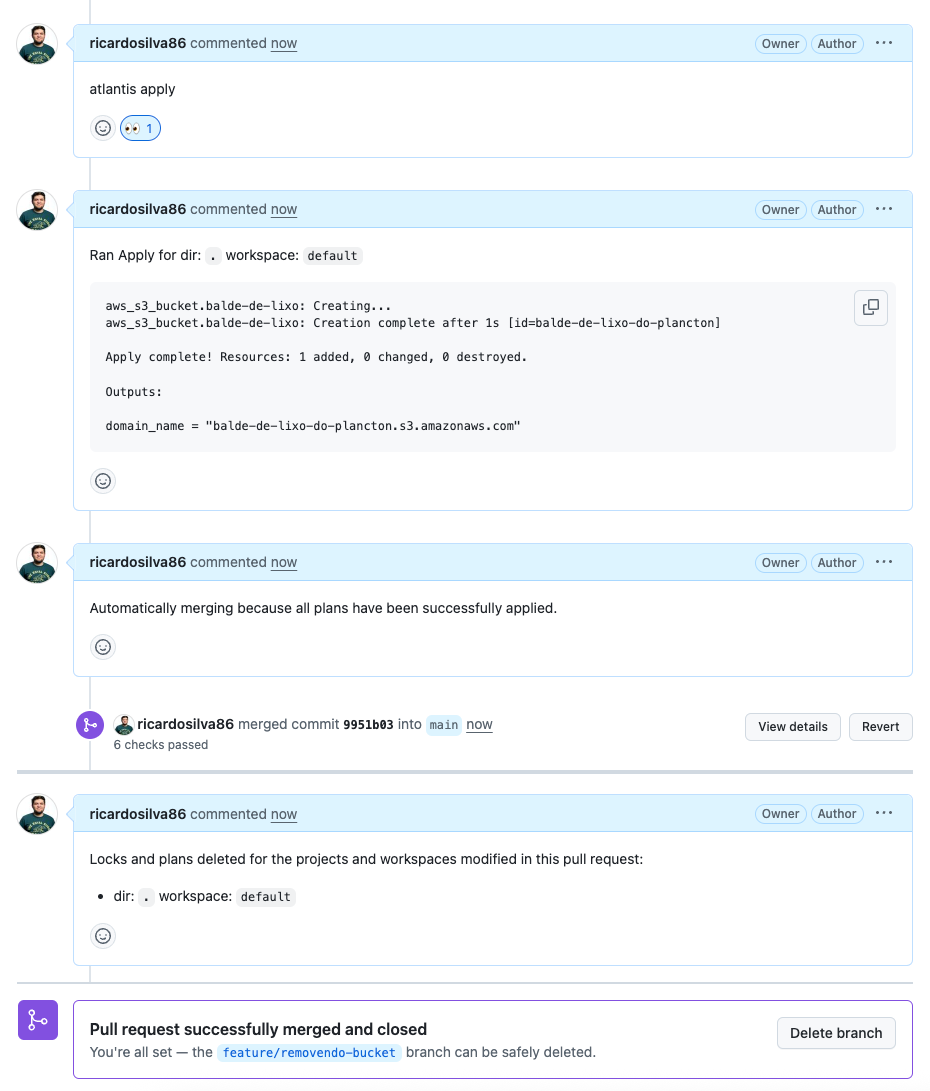
aws_s3_bucket.balde-de-lixo: Creating...
aws_s3_bucket.balde-de-lixo: Creation complete after 1s [id=balde-de-lixo-do-plancton]

Apply complete! Resources: 1 added, 0 changed, 0 destroyed.

Outputs:

domain_name = "balde-de-lixo-do-plancton.s3.amazonaws.com"
Let’s see if it really worked?
aws s3 cp atlantis.yaml s3://balde-de-lixo-do-plancton --region eu-central-1
Result:
upload: ./atlantis.yaml to s3://balde-de-lixo-do-plancton/atlantis.yaml
Custom Workflow
So far, it’s been easy… we created a repos.yaml and a docker compose file, exposed the service via zrok, configured the webhook and voilà, things worked automagically.
But normally life isn’t fair, nor so simple. There are cases where we need a different flow from Atlantis’s default to work correctly. That’s where custom workflows come in.
To demonstrate a custom workflow, I’ll use infracost as the main example, and then I’ll present a small example of how to use custom workflow to work with different environments, dev and production.
Infracost
What is Infracost:
Infracost shifts cloud costs left and transforms FinOps from reactive to proactive. It integrates into the engineering workflow (e.g. GitHub, Azure Repos) and shows the cost impact of code changes before deployment — preventing expensive mistakes.
In other words, before applying and finding out it’s going to be expensive, Infracost will tell us “how much this fun is going to cost”.
So let’s integrate Atlantis with Infracost in a custom workflow. First we need to add the workflow to repos.yaml, so at the end of the file add the following content:
workflows:
  infracost:
    plan:
      steps:
        - init
        - plan
        - run: infracost breakdown --path .
Next, let’s generate an API Key on the Infracost website so we can use the CLI, follow these steps here
to get your key. When you have this key, add the INFRACOST_API_KEY environment variable to our docker-compose.yaml.
Let’s get to know another Atlantis feature, the atlantis.yaml which is a configuration file on the repository side and no longer on the server side.
Create the atlantis.yaml file in our repository with the following content:
version: 3
projects:
  - name: default
    dir: .
    workflow: infracost
    autoplan:
      when_modified: [ "*.tf", "*.tfvars" ]
And we need one more change, now we need the infracost cli in our container to be able to use the command, let’s change our docker-compose.yaml and build a custom image that installs infracost instead of using the official image.
Create a Dockerfile with the following content:
FROM ghcr.io/runatlantis/atlantis:latest

# Install dependencies and Infracost CLI
USER root
RUN apk update && \
    apk add --no-cache curl && \
    curl -fsSL https://raw.githubusercontent.com/infracost/infracost/master/scripts/install.sh | sh && \
    rm -rf /var/cache/apk/*
USER atlantis
Go back to docker-compose.yaml and change the following:
atlantis:
-   image: ghcr.io/runatlantis/atlantis:latest
+   build: .
That is, remove the line containing the image and replace it with build.
To recreate our stack let’s run the following command:
docker compose down && docker compose up -d
It will take a bit longer to start because now Docker will build the image before starting Atlantis.
The convenience that the configuration file brings being on the repository side is:
- it’s not necessary to restart Atlantis when there’s a configuration change and
- you can define multiple folders in the same repository containing code from different parts of your infrastructure and just create the reference in
atlantis.yamlpointing to which workflow should be used.
Unfortunately, some configuration features are only available on the server side. For more information, see the documentation for each of the files here and here .
If you use
terragrunt, the process will be similar, you need to create a custom image with theterragruntbinary and create a custom flow to runterragruntinstead ofterraform.
So, did it work?
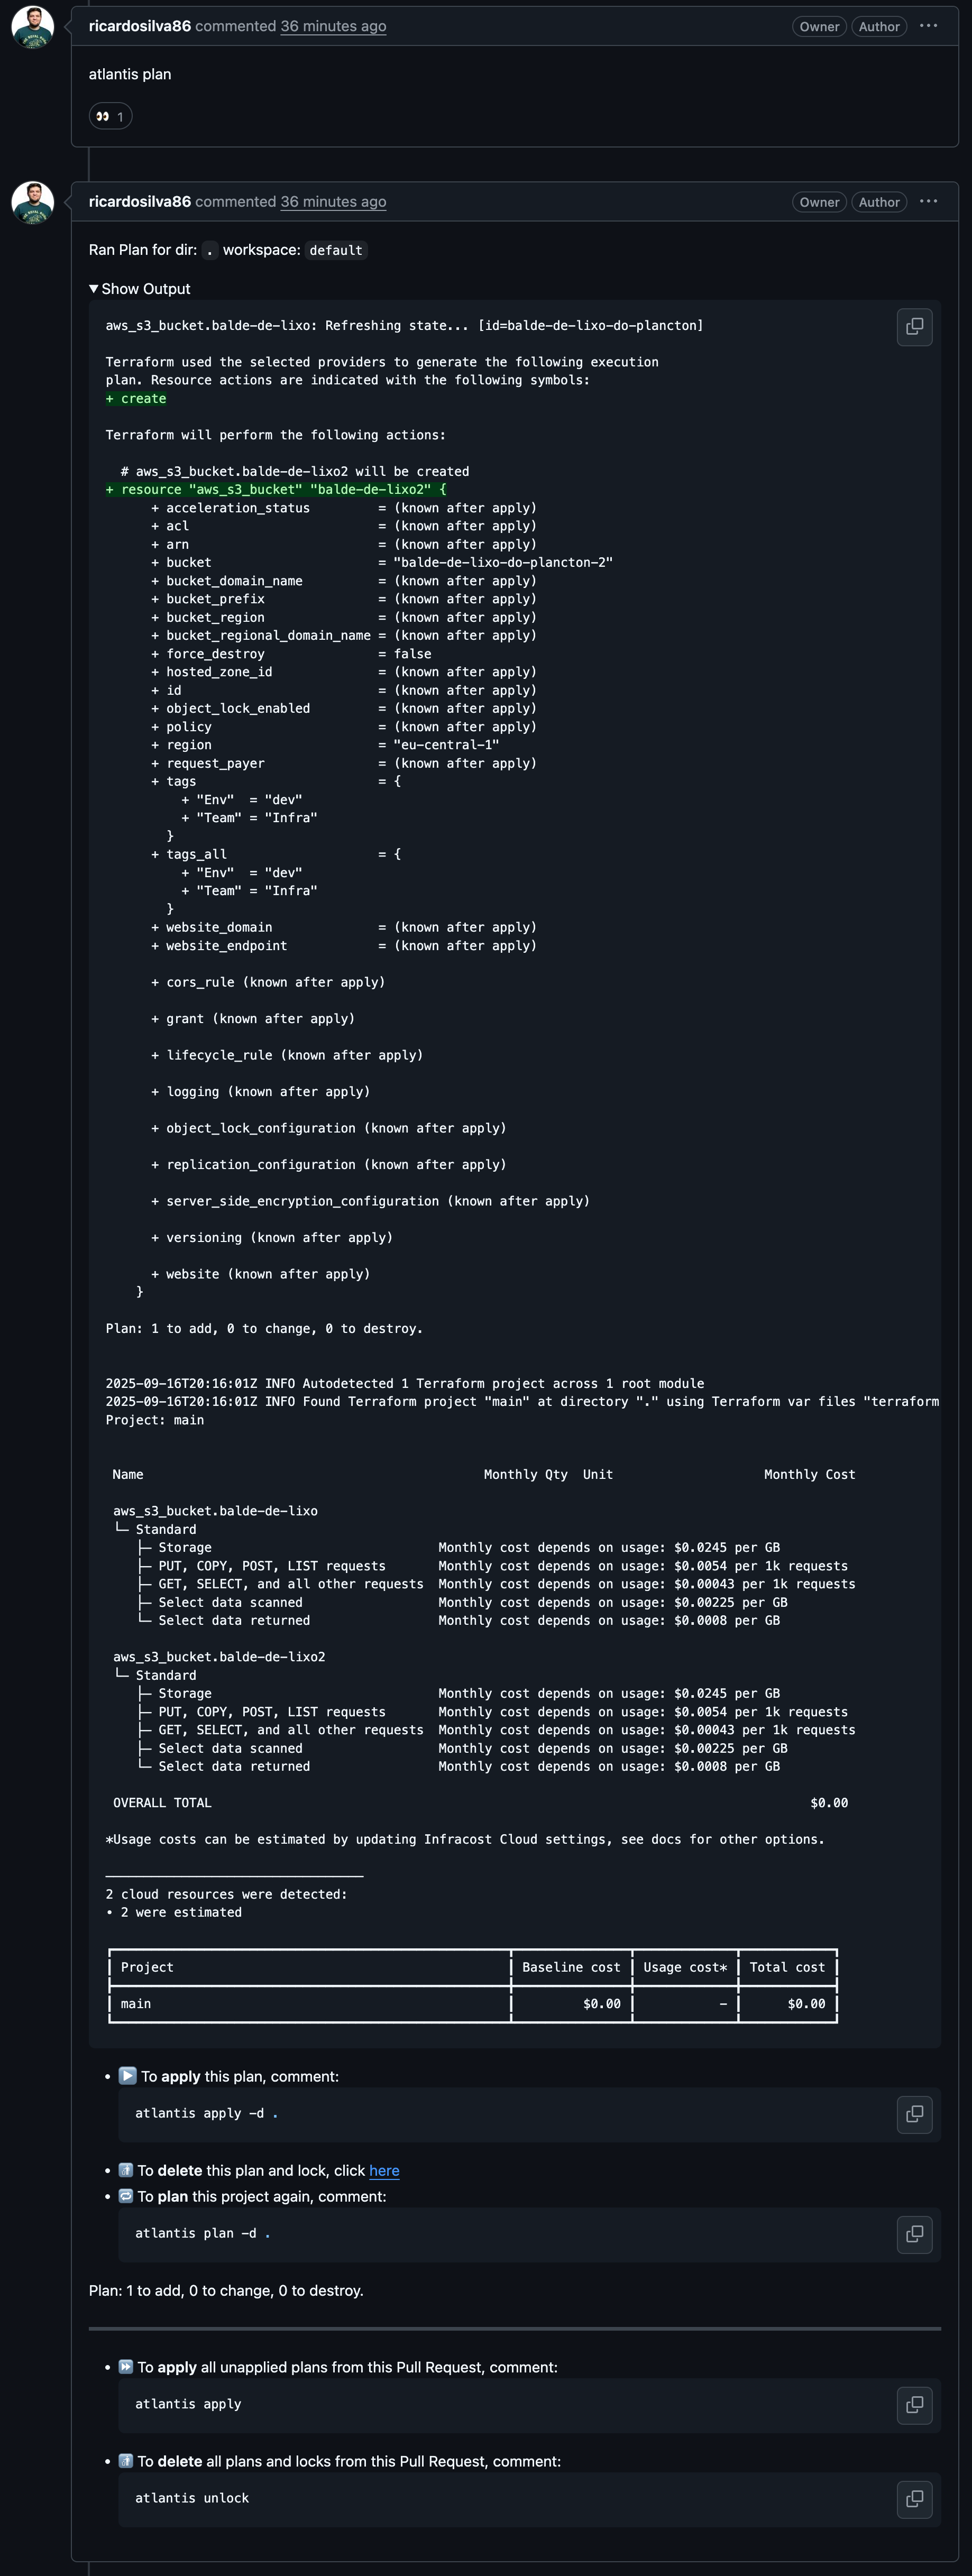
aws_s3_bucket.balde-de-lixo: Refreshing state... [id=balde-de-lixo-do-plancton]

Terraform used the selected providers to generate the following execution
plan. Resource actions are indicated with the following symbols:
+ create

Terraform will perform the following actions:

  # aws_s3_bucket.balde-de-lixo2 will be created
+ resource "aws_s3_bucket" "balde-de-lixo2" {
      + acceleration_status         = (known after apply)
      + acl                         = (known after apply)
      + arn                         = (known after apply)
      + bucket                      = "balde-de-lixo-do-plancton-2"
      + bucket_domain_name          = (known after apply)
      + bucket_prefix               = (known after apply)
      + bucket_region               = (known after apply)
      + bucket_regional_domain_name = (known after apply)
      + force_destroy               = false
      + hosted_zone_id              = (known after apply)
      + id                          = (known after apply)
      + object_lock_enabled         = (known after apply)
      + policy                      = (known after apply)
      + region                      = "eu-central-1"
      + request_payer               = (known after apply)
      + tags                        = {
          + "Env"  = "dev"
          + "Team" = "Infra"
        }
      + tags_all                    = {
          + "Env"  = "dev"
          + "Team" = "Infra"
        }
      + website_domain              = (known after apply)
      + website_endpoint            = (known after apply)

      + cors_rule (known after apply)

      + grant (known after apply)

      + lifecycle_rule (known after apply)

      + logging (known after apply)

      + object_lock_configuration (known after apply)

      + replication_configuration (known after apply)

      + server_side_encryption_configuration (known after apply)

      + versioning (known after apply)

      + website (known after apply)
    }

Plan: 1 to add, 0 to change, 0 to destroy.


2025-09-16T20:16:01Z INFO Autodetected 1 Terraform project across 1 root module
2025-09-16T20:16:01Z INFO Found Terraform project "main" at directory "." using Terraform var files "terraform.tfvars"
Project: main


 Name                                             Monthly Qty  Unit                    Monthly Cost

 aws_s3_bucket.balde-de-lixo
 └─ Standard
    ├─ Storage                              Monthly cost depends on usage: $0.0245 per GB
    ├─ PUT, COPY, POST, LIST requests       Monthly cost depends on usage: $0.0054 per 1k requests
    ├─ GET, SELECT, and all other requests  Monthly cost depends on usage: $0.00043 per 1k requests
    ├─ Select data scanned                  Monthly cost depends on usage: $0.00225 per GB
    └─ Select data returned                 Monthly cost depends on usage: $0.0008 per GB

 aws_s3_bucket.balde-de-lixo2
 └─ Standard
    ├─ Storage                              Monthly cost depends on usage: $0.0245 per GB
    ├─ PUT, COPY, POST, LIST requests       Monthly cost depends on usage: $0.0054 per 1k requests
    ├─ GET, SELECT, and all other requests  Monthly cost depends on usage: $0.00043 per 1k requests
    ├─ Select data scanned                  Monthly cost depends on usage: $0.00225 per GB
    └─ Select data returned                 Monthly cost depends on usage: $0.0008 per GB

 OVERALL TOTAL                                                                               $0.00

*Usage costs can be estimated by updating Infracost Cloud settings, see docs for other options.

──────────────────────────────────
2 cloud resources were detected:
∙ 2 were estimated

┏━━━━━━━━━━━━━━━━━━━━━━━━━━━━━━━━━━━━━━━━━━━━━━━━━━━━┳━━━━━━━━━━━━━━━┳━━━━━━━━━━━━━┳━━━━━━━━━━━━┓
┃ Project                                            ┃ Baseline cost ┃ Usage cost* ┃ Total cost ┃
┣━━━━━━━━━━━━━━━━━━━━━━━━━━━━━━━━━━━━━━━━━━━━━━━━━━━━╋━━━━━━━━━━━━━━━╋━━━━━━━━━━━━━╋━━━━━━━━━━━━┫
┃ main                                               ┃         $0.00 ┃           - ┃      $0.00 ┃
┗━━━━━━━━━━━━━━━━━━━━━━━━━━━━━━━━━━━━━━━━━━━━━━━━━━━━┻━━━━━━━━━━━━━━━┻━━━━━━━━━━━━━┻━━━━━━━━━━━━┛
Conclusion
In this article, I presented Atlantis as an accessible and powerful GitOps solution for automating our Terraform workflows, eliminating the need to manually run terraform apply from our machine.
I guided you through the installation and configuration process using Docker Compose and zrok to expose our local instance to the internet. We covered the essential steps, such as:
- Getting AWS access credentials.
- Generating a personal access token on GitHub.
- Configuring the webhook in the repository so that Atlantis is notified about new Pull Requests.
Finally, we demonstrated the complete flow in action. We saw how a Pull Request with infrastructure code changes triggered an automatic terraform plan as a comment and, after approval, a simple atlantis apply was enough to execute the changes, validating our entire setup with the creation of an S3 bucket.
PS: here you are an article from a brilliant guy, Bruno with a smart way to deploy Atlantins on Google Cloud Run